Designing and making a medal
A medal can be made using three different techniques :
1 – Hand engraving or « direct carving »
This traditional technique allows the craftsman to directly execute his work at the actual size and in the actual material, without using any machine. The engraver copies his drawing on the steel die, reverses it; then he follows closely his pattern, cuts into the material with his tools (gravers, onglettes hit with a hammer, chisels, sometimes ciselets) to create his model. He achieves his engraving on a punch (right side up) or a die (upside down) with the aim of batch striking his work. This technique requires a great proficiency, for an error is quite difficult to fix. This work also requires a talent for drawing, bas-relief carving and mastering of en modelé engraving.
2- The reducing technique of a bas-relief sculpture
The model is first produced with plaster at scale 3:1, then downsized with a pantograph or a reducing lathe (machine developed for coins and medals since the 16th century). Finally, the engraver hand removes any trace of the mechanical treatment with chisels, gravers and ciselets.
3 – Modern engraving techniques
Probing of a bas-relief sculpture, laser machining, grinding with digital operations, engraving software for design development (à plat or en modelé).
The main stages of my medal making workflow
1 – The design
In order to convey the image of the project, I develop and draw a few mock-ups. Thus, the future medal is born under the pencil.
2 – the sculpture


Once the designs of the obverse and reverse are set, the engraver starts the bas-relief sculptures of each design. This step towards the realization of the project involves modeling of the drawing, scale 3:1. Thus, the broad masses come to life and emerge from the plane.
Then, from plaster prints to counter-prints, worked on and carved by hand, the design takes shape. The final shape is molded with a resin to serve as a template in order to be reproduced on a steel block.
3 – Reproduction of sculptures on dies

A steel block is positioned on a reducing lathe, on the left, and the resin print of the sculpture is set on the right.
Now the machining begins. A touch probe inspects the entire surface of the sculpture and reproduce the shapes encountered in the piece of steel with a cutting tool. This step is long and accurate, we must outline at first and finish with the ‘finishing pass’ to engrave the details in steel.
4 – Hand engraving the steel dies

Finally, the engraver removes any trace of the mecanical treatment on the die. This step is achieved using gravers hit with a hammer, onglettes, chisels, ciselets, traçoirs, mats… He redraws and highlights the main lines of the designs.

Photographs Matthieu Cellard
Thus, light, future key partner, will, by its passage, highlight the bas-reliefs, details and subtleties of the future medal. While hand finishing, the engraver now adds his « touch » and brings the future medal to life.
5 – Finally, the striking of the medals
Thus engraved, the dies are heat treated and become usable by the striker.
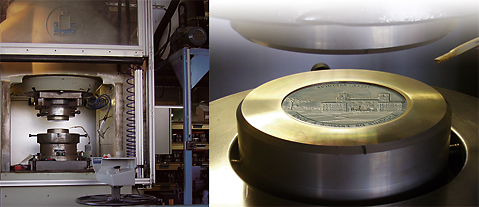
The dies, placed on a 1600 ton press, will mark the bronze sides of the medals. Each medal is struck and then annealed in the oven, then struck again until all reliefs are obtained. After the stamping stage, they are machined according to their diameter.
The patina finish puts the finishing touches to the medal and highlights the work of the artist. This operation has remained in the craft tradition as all the medals are reworked and hand finished.
At the end of this long process, after carefully following all these steps, a medal is truly born.